
247 lines
10 KiB
Markdown
247 lines
10 KiB
Markdown
|
|
> Name
|
|
|
|
多重均线与随机指标结合的趋势跟踪交易策略-Multi-SMA-and-Stochastic-Combined-Trend-Following-Trading-Strategy
|
|
|
|
> Author
|
|
|
|
ChaoZhang
|
|
|
|
> Strategy Description
|
|
|
|
|
|
|
|
[trans]
|
|
#### 概述
|
|
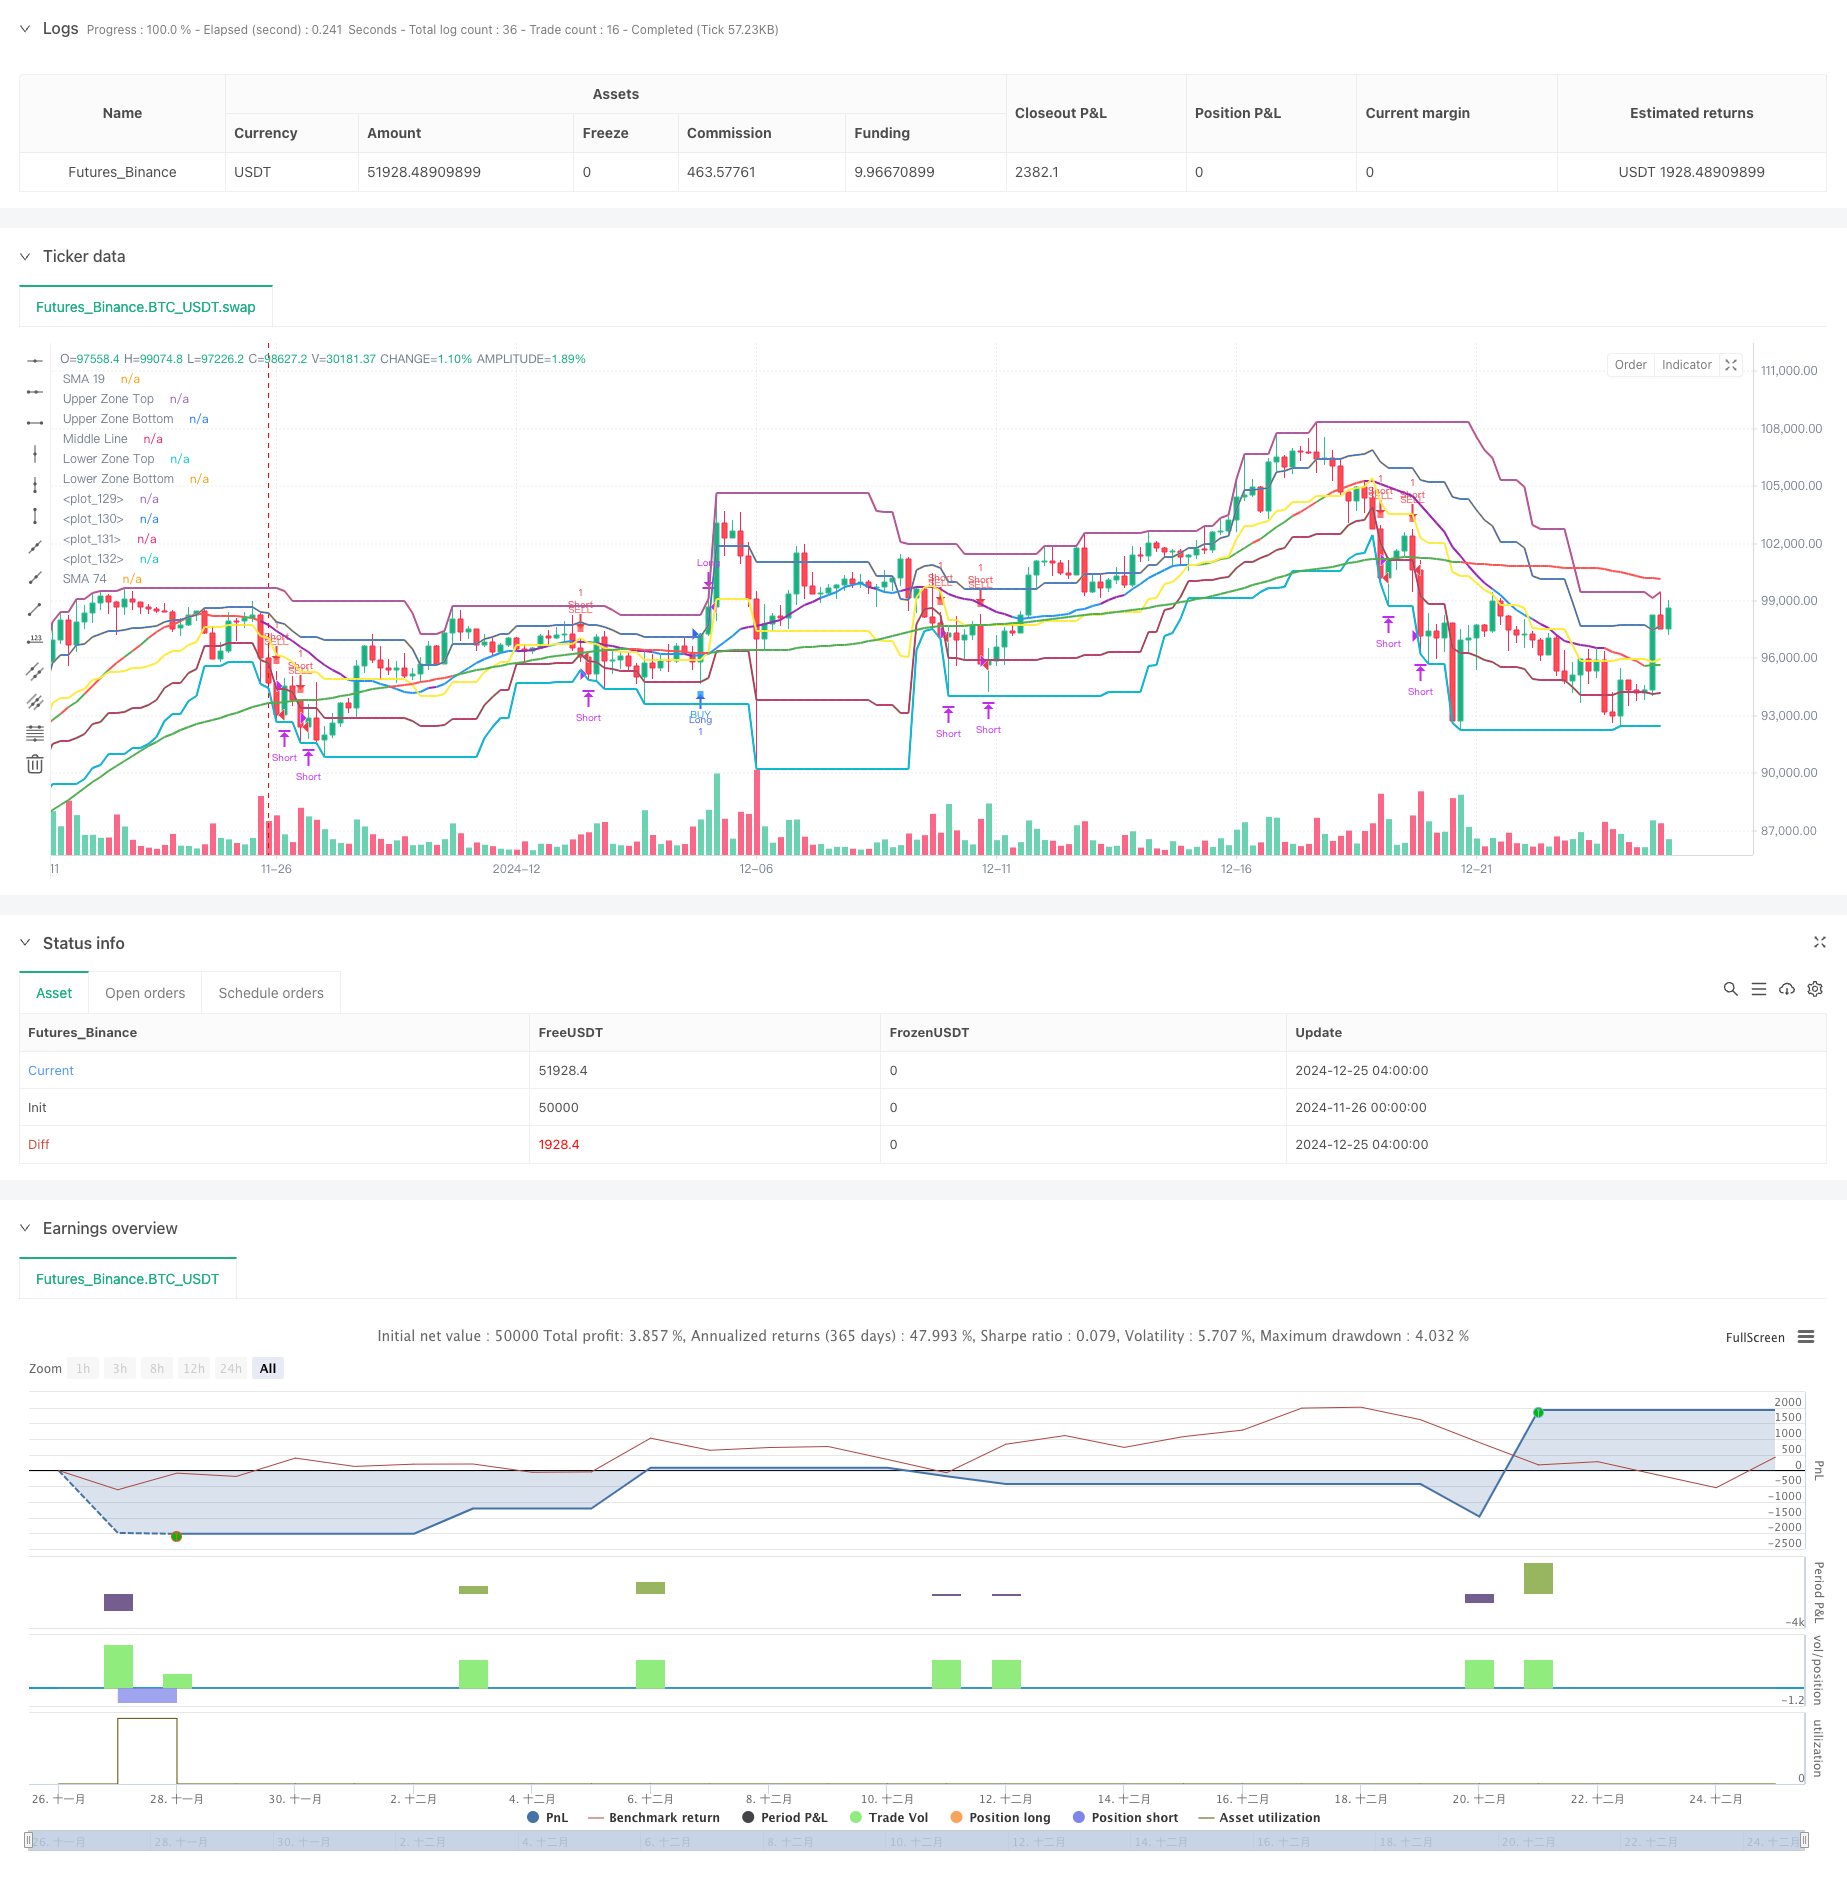
该策略是一个结合了多重移动平均线(SMA)和随机指标(KDJ)的趋势跟踪交易系统。通过设定价格区间和趋势判断条件,在市场趋势明确时进行交易。策略采用了动态止损机制,根据市场走势调整持仓管理,既保护既有利润又不会过早离场。
|
|
|
|
#### 策略原理
|
|
策略主要基于以下几个核心组件:
|
|
1. 双均线系统:使用19周期和74周期SMA作为趋势判断工具
|
|
2. 价格区间:将价格区间分为5个等级,用于判断市场强弱
|
|
3. 随机指标:使用60周期的随机指标进行超买超卖判断
|
|
4. 趋势确认:通过连续3根K线的走势判断趋势的持续性
|
|
5. 入场条件:价格突破74周期SMA且位于相应价格区间时入场
|
|
6. 止损机制:采用跟踪止损,在趋势改变时及时离场
|
|
|
|
#### 策略优势
|
|
1. 系统完整性:结合了趋势跟踪和动量指标,提供了全面的市场分析
|
|
2. 风险管理:采用多重止损机制,包括硬性止损和跟踪止损
|
|
3. 适应性强:通过参数调整可以适应不同市场环境
|
|
4. 趋势把握:能够有效捕捉中长期趋势,避免虚假信号
|
|
5. 持仓管理:根据市场状态动态调整持仓,提高资金使用效率
|
|
|
|
#### 策略风险
|
|
1. 震荡市场风险:在横盘市场可能产生频繁交易
|
|
2. 滑点风险:在快速行情中可能面临较大滑点
|
|
3. 参数敏感性:不同参数组合可能导致策略表现差异较大
|
|
4. 市场环境依赖:策略在趋势明显的市场中表现更好
|
|
5. 资金管理风险:全仓操作可能带来较大回撤风险
|
|
|
|
#### 策略优化方向
|
|
1. 引入波动率指标:考虑添加ATR指标来动态调整止损位置
|
|
2. 优化入场时机:可以增加成交量确认来提高入场准确性
|
|
3. 完善资金管理:建议添加仓位管理模块,根据风险动态调整仓位
|
|
4. 增加市场环境判断:可以添加趋势强度指标来过滤交易信号
|
|
5. 改进止损机制:可以考虑使用百分比跟踪止损来提高灵活性
|
|
|
|
#### 总结
|
|
该策略通过结合多重技术指标构建了一个完整的交易系统,具有良好的趋势跟踪能力和风险管理机制。虽然在某些市场环境下可能面临挑战,但通过持续优化和完善,策略有望在不同市场环境下都能保持稳定表现。建议交易者在实盘使用时注意控制仓位,合理设置止损,并根据市场情况适时调整参数。 ||
|
|
|
|
#### Overview
|
|
This strategy is a trend following trading system that combines multiple Simple Moving Averages (SMA) with the Stochastic oscillator. It executes trades when market trends are clearly defined by establishing price zones and trend identification conditions. The strategy employs a dynamic stop-loss mechanism that adjusts position management based on market movements, both protecting profits and avoiding premature exits.
|
|
|
|
#### Strategy Principles
|
|
The strategy is built on several core components:
|
|
1. Dual SMA System: Uses 19-period and 74-period SMAs for trend determination
|
|
2. Price Zones: Divides price range into 5 levels for market strength assessment
|
|
3. Stochastic Oscillator: Employs 60-period stochastic for overbought/oversold conditions
|
|
4. Trend Confirmation: Uses three consecutive candles to confirm trend continuation
|
|
5. Entry Conditions: Enters when price crosses 74-period SMA and is within specified price zones
|
|
6. Stop-Loss Mechanism: Implements trailing stops with trend-based exits
|
|
|
|
#### Strategy Advantages
|
|
1. System Completeness: Combines trend following and momentum indicators for comprehensive market analysis
|
|
2. Risk Management: Multiple stop-loss mechanisms including hard stops and trailing stops
|
|
3. Adaptability: Can be adjusted for different market conditions through parameter optimization
|
|
4. Trend Capture: Effectively captures medium to long-term trends while avoiding false signals
|
|
5. Position Management: Dynamically adjusts positions based on market conditions for efficient capital utilization
|
|
|
|
#### Strategy Risks
|
|
1. Choppy Market Risk: May generate frequent trades in sideways markets
|
|
2. Slippage Risk: Potentially significant slippage in fast-moving markets
|
|
3. Parameter Sensitivity: Different parameter combinations may lead to varying performance
|
|
4. Market Environment Dependency: Strategy performs better in trending markets
|
|
5. Capital Management Risk: Full position sizing may lead to significant drawdowns
|
|
|
|
#### Optimization Directions
|
|
1. Incorporate Volatility Indicators: Consider adding ATR for dynamic stop-loss adjustment
|
|
2. Optimize Entry Timing: Add volume confirmation to improve entry accuracy
|
|
3. Enhance Capital Management: Implement position sizing module based on risk assessment
|
|
4. Add Market Environment Analysis: Include trend strength indicators to filter signals
|
|
5. Improve Stop-Loss Mechanism: Consider percentage-based trailing stops for better flexibility
|
|
|
|
#### Summary
|
|
This strategy builds a comprehensive trading system by combining multiple technical indicators, featuring strong trend-following capabilities and risk management mechanisms. While it may face challenges in certain market conditions, continuous optimization and refinement can help maintain stable performance across different market environments. Traders are advised to control position sizes, set appropriate stop-losses, and adjust parameters according to market conditions when implementing the strategy in live trading.[/trans]
|
|
|
|
|
|
|
|
> Source (PineScript)
|
|
|
|
``` pinescript
|
|
/*backtest
|
|
start: 2024-11-26 00:00:00
|
|
end: 2024-12-25 08:00:00
|
|
period: 4h
|
|
basePeriod: 4h
|
|
exchanges: [{"eid":"Futures_Binance","currency":"BTC_USDT"}]
|
|
*/
|
|
|
|
//@version=5
|
|
strategy("Purple SMA Strategy", overlay=true)
|
|
|
|
// === INPUTS ===
|
|
zoneLength = input.int(20, "Price Zone Length", minval=5)
|
|
tickSize = input.float(1.0, "Tick Size for Hard Stop")
|
|
hardStopTicks = input.int(50, "Hard Stop Loss in Ticks")
|
|
|
|
// === CALCULATE ZONES ===
|
|
h = ta.highest(high, zoneLength)
|
|
l = ta.lowest(low, zoneLength)
|
|
priceRange = h - l
|
|
lvl5 = h
|
|
lvl4 = l + (priceRange * 0.75) // Orange line
|
|
lvl3 = l + (priceRange * 0.50) // Yellow line
|
|
lvl2 = l + (priceRange * 0.25) // Green line
|
|
lvl1 = l
|
|
|
|
// === INDICATORS ===
|
|
sma19 = ta.sma(close, 19)
|
|
sma74 = ta.sma(close, 74)
|
|
|
|
// === CANDLE COLOR CONDITIONS ===
|
|
isGreenCandle = close > open
|
|
isRedCandle = close < open
|
|
|
|
// === CONTINUOUS TREND DETECTION ===
|
|
isThreeGreenCandles = close > open and close[1] > open[1] and close[2] > open[2]
|
|
isThreeRedCandles = close < open and close[1] < open[1] and close[2] < open[2]
|
|
|
|
var bool inGreenTrend = false
|
|
var bool inRedTrend = false
|
|
|
|
// Update trends
|
|
if isThreeGreenCandles
|
|
inGreenTrend := true
|
|
inRedTrend := false
|
|
if isThreeRedCandles
|
|
inRedTrend := true
|
|
inGreenTrend := false
|
|
if (inGreenTrend and isRedCandle) or (inRedTrend and isGreenCandle)
|
|
inGreenTrend := false
|
|
inRedTrend := false
|
|
|
|
// === STOCHASTIC CONDITIONS ===
|
|
k = ta.stoch(close, high, low, 60)
|
|
d = ta.sma(k, 10)
|
|
isOverbought = d >= 80
|
|
isOversold = d <= 20
|
|
stochUp = d > d[1]
|
|
stochDown = d < d[1]
|
|
|
|
// === SMA COLOR LOGIC ===
|
|
sma19Color = if isOverbought and stochUp
|
|
color.green
|
|
else if isOverbought and stochDown
|
|
color.red
|
|
else if isOversold and stochUp
|
|
color.green
|
|
else if isOversold and stochDown
|
|
color.red
|
|
else if stochUp
|
|
color.blue
|
|
else if stochDown
|
|
color.purple
|
|
else
|
|
color.gray
|
|
|
|
sma74Color = sma74 < sma19 ? color.green : color.red
|
|
|
|
// === CROSSING CONDITIONS ===
|
|
crossUpSMA = ta.crossover(close, sma74)
|
|
crossDownSMA = ta.crossunder(close, sma74)
|
|
|
|
// === ENTRY CONDITIONS ===
|
|
buyCondition = crossUpSMA and close > lvl4
|
|
sellCondition = crossDownSMA and close < lvl2
|
|
|
|
// === POSITION MANAGEMENT ===
|
|
var float stopLevel = na
|
|
var bool xMode = false
|
|
|
|
// Entry and Stop Loss
|
|
if buyCondition
|
|
strategy.entry(id="Long", direction=strategy.long)
|
|
stopLevel := close - (hardStopTicks * tickSize)
|
|
xMode := false
|
|
|
|
if sellCondition
|
|
strategy.entry(id="Short", direction=strategy.short)
|
|
stopLevel := close + (hardStopTicks * tickSize)
|
|
xMode := false
|
|
|
|
// Update stops based on X's
|
|
if strategy.position_size != 0 and (inGreenTrend or inRedTrend)
|
|
xMode := true
|
|
if strategy.position_size > 0 // Long position
|
|
stopLevel := low
|
|
else // Short position
|
|
stopLevel := high
|
|
|
|
// Exit logic
|
|
if strategy.position_size > 0 // Long position
|
|
if low <= stopLevel
|
|
strategy.close(id="Long")
|
|
else if xMode and not (inGreenTrend or inRedTrend)
|
|
strategy.close(id="Long")
|
|
|
|
if strategy.position_size < 0 // Short position
|
|
if high >= stopLevel
|
|
strategy.close(id="Short")
|
|
else if xMode and not (inGreenTrend or inRedTrend)
|
|
strategy.close(id="Short")
|
|
|
|
// === PLOTTING ===
|
|
plot(sma19, "SMA 19", color=sma19Color, linewidth=2)
|
|
plot(sma74, "SMA 74", color=sma74Color, linewidth=2)
|
|
plot(lvl5, "Upper Zone Top", color=color.red, linewidth=2)
|
|
plot(lvl4, "Upper Zone Bottom", color=color.orange, linewidth=2)
|
|
plot(lvl3, "Middle Line", color=color.yellow, linewidth=2)
|
|
plot(lvl2, "Lower Zone Top", color=color.green, linewidth=2)
|
|
plot(lvl1, "Lower Zone Bottom", color=color.blue, linewidth=2)
|
|
|
|
// Plot X signals
|
|
plotshape(inGreenTrend, title="Bullish Line", style=shape.xcross, location=location.belowbar, color=color.white, size=size.tiny)
|
|
plotshape(inRedTrend, title="Bearish Line", style=shape.xcross, location=location.abovebar, color=color.white, size=size.tiny)
|
|
|
|
// Zone fills
|
|
var p1 = plot(lvl5, display=display.none)
|
|
var p2 = plot(lvl4, display=display.none)
|
|
var p3 = plot(lvl2, display=display.none)
|
|
var p4 = plot(lvl1, display=display.none)
|
|
fill(p1, p2, color=color.new(color.red, 90))
|
|
fill(p3, p4, color=color.new(color.green, 90))
|
|
|
|
// Plot entry signals
|
|
plotshape(buyCondition, title="Buy", style=shape.square, location=location.belowbar, color=color.new(color.blue, 20), size=size.tiny, text="BUY", textcolor=color.blue)
|
|
plotshape(sellCondition, title="Sell", style=shape.square, location=location.abovebar, color=color.new(color.red, 20), size=size.tiny, text="SELL", textcolor=color.red)
|
|
```
|
|
|
|
> Detail
|
|
|
|
https://www.fmz.com/strategy/476255
|
|
|
|
> Last Modified
|
|
|
|
2024-12-27 14:43:30
|